20 things to do after installing Kali Linux
I’ve compiled a small list of things that I always perform after installing a fresh copy of Kali Linux in this post. Because I got multiple laptops and workstations, I’ve tried to generalize the following instructions to suit everyone’s(including mine??) requirements. This is my top list of 20 things to do after installing Kali Linux. Your requirement’s might be completely different. If you have a suggestion, let me know via comments section. You can comment without registering.. so that’s an easy way to give me feedback and opinion. 
Standard Packages:
Standard packages contains anything and everything I found useful. This list if divided into 3 parts:
Kali Specific
Kali Linux is a special build from Debian. Kali Linux inherits a lot of the issues from Debian Linux. This section shows you how to resolve of those. They are not specific to Kali Linux only and you might be leave them as it is, but I found that if I see an error my OCD kicks in and I have to make it go away…
Useful utilities and Software’s
A collection of utilities and software’s I found useful. These are day to day software’s that are available in most other Linux distributions or at least I think they should be made available as part of a default installation.
Enhancements and accessibility
Kali Linux is made to boot up fast and low of resources. But if you have some more CPU and GPU power to spare, you might want to try to make it look more colorful.
Kali Specific:
1. Fix Device not managed error – wired network
If you want NetworkManager to handle interfaces that are enabled in /etc/network/interfaces: Setmanaged=true in /etc/NetworkManager/NetworkManager.conf. So this file looks like:[main]
plugins=ifupdown,keyfile
[ifupdown]
managed=true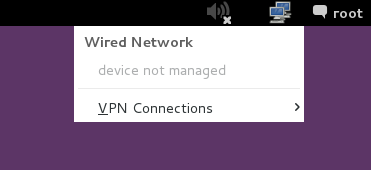
Read the full article on fixing Wired Network interface “Device not managed” error in Debian or Kali Linux.
2. Fix default repository
The simplest way is to edit the /etc/apt/sources.list remove or comment every-line with # at the front and add the following lines.. leafpad /etc/apt/sources.list
Comment or remove existing config with the following lines:## Regular repositories
deb http://http.kali.org/kali kali main non-free contrib
deb http://security.kali.org/kali-security kali/updates main contrib non-free
## Source repositories
deb-src http://http.kali.org/kali kali main non-free contrib
deb-src http://security.kali.org/kali-security kali/updates main contrib non-free
Save and close the file. Details and explanations can be found in adding official Kali Linux Repositories page.
3. Update, Upgrade, Dist-Upgrade
Clean, update, upgrade and dist-upgrade your Kali installation. apt-get clean && apt-get update && apt-get upgrade -y && apt-get dist-upgrade -y
4. Fix PulseAudio warning
My Kali throws me this warning:[warn] PulseAudio configured for per-user sessions ... (warning).
Debian variants also throws similar warning during boot.To fix this do the following:
leafpad /etc/default/pulseaudio
Find this line:PULSEAUDIO_SYSTEM_START=0
Replace 0 with 1PULSEAUDIO_SYSTEM_START=1
Where, 0 = don’t start in system mode, 1 = start in system mode
reboot
Details and explanations can be found in Fixing PulseAudio configured for per-user sessions … (warning) in Kali Linux page.
5. Enable sound on Boot
Follow the steps below to fix sound mute in Kali Linux on bootapt-get install alsa-utils -y
In GNOME Desktop (The default Kali Desktop)
Right Click on the small volume ICON and select Sound Preferences
Alternatively, you can also go to Applications > System Tools > Preferences > System Settings > Sound to bring up the same options.
Use the Output volume slider to ON, shown similar the screenshot above. That’s it you’re done. CloseSound window.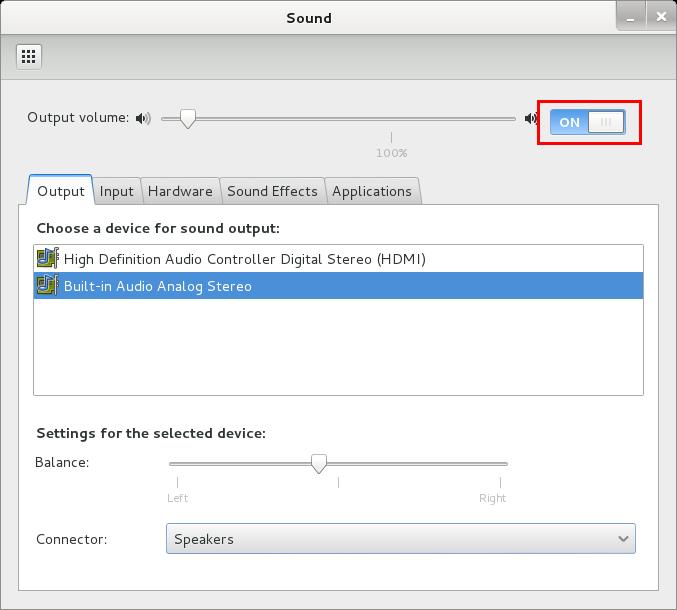
Details and explanations can be found in fixing sound mute in Kali Linux on boot page.
Useful utilities and Software’s
6. Install Java
Go to the following link and download jdk7. At the time of writing this guide the jdk version was jdk-7u45-linux-x64. Note that I’m using x64 which is 64-bit. 32-bit users should choose their versions accordingly. Not that tough really! ![]()
Following is what I’ve used. JDK-7u45-Linux-x64 At the time of writing this guide the available version was jdk-7u45-linux-x64.tar.gz Download and save the file in /root directory.tar -xzvf /root/jdk-7u45-linux-x64.tar.gz
mv jdk1.7.0_45 /opt
cd /opt/jdk1.7.0_45
This step registers the downloaded version of Java as an alternative, and switches it to be used as the default:update-alternatives --install /usr/bin/java java /opt/jdk1.7.0_45/bin/java 1
update-alternatives --install /usr/bin/javac javac /opt/jdk1.7.0_45/bin/javac 1
update-alternatives --install /usr/lib/mozilla/plugins/libjavaplugin.so mozilla-javaplugin.so /opt/jdk1.7.0_45/jre/lib/amd64/libnpjp2.so 1
update-alternatives --set java /opt/jdk1.7.0_45/bin/java
update-alternatives --set javac /opt/jdk1.7.0_45/bin/javac
update-alternatives --set mozilla-javaplugin.so /opt/jdk1.7.0_45/jre/lib/amd64/libnpjp2.so
Follow installing Java JDK in Kali Linux post for step by step instructions and testing options.
7. Install Flash
This is fairly simple and easy and should work from most people out there: In the terminal:apt-get install flashplugin-nonfree
and then type in:update-flashplugin-nonfree --install
That’s it. You flash should be working as expected.
Follow installing Flash in Kali Linux post for step by step instructions and testing options. This post also includes manual Flash installation procedures for those whose installation might fail with above mentioned process.
8. Install File Roller – Archive Manager
Kali Linux lacks a proper GUI archive manager. Install it Archive Manager (File Roller) using the following command:apt-get install unrar unace rar unrar p7zip zip unzip p7zip-full p7zip-rar file-roller -y
You can now find Archive Manager in Applications > Accessories > Archive Manager.
9. Add a standard user
Kali Linux got only root user by default. While most applications require root access, it’s always a good idea to add a second user. Open terminal and type following to create new user (replace user1 with your desired user name)useradd -m user1
(Note: -m means create home directory which is usually /home/username) 
Now set password for this userpasswd user1
Enter desired password twice Add user to sudo group (to allow user to install software, allow printing, use privileged mode etc.)usermod -a -G sudo user1
(Note: -a means append or add and –G mean to specified group/groups) Change default shell of previously created user to bashchsh -s /bin/bash user1
To learn more, follow this excellent and detailed post on adding remove user (standard user/non-root) in Kali Linux. This post explains how to add a user with all user directories already in place (thereby avoiding “Could not update .ICEauthority var/lib/gdm3/.ICEauthority” or any error containing .ICEauthority or permission in general.
10. Add add-apt-repository
Debian allows users to add and use PPA repositories by an application named add-apt-repository however, Kali Linux didn’t include this in their default package list. With Kali, because this is a special purpose application and certain modifications were made to make it work for what it does best (Penetration Test). To enable PPA Repository via add-apt-repository application, follow the steps below: First install Python Software properties package.apt-get install python-software-properties
Next install apt-fileapt-get install apt-file
Update apt-file.apt-file update
This takes a while, so in case your apt-file update is SLOW, you might want to try and fix that as well. (Note that I got repo.kali.org in my /etc/apt/sources.list file instead of http.kali.org.) Once apt-file updateis complete, you should be able to search for it.apt-file search add-apt-repository
Your output should look similar to this:python-software-properties: /usr/bin/add-apt-repository
python-software-properties: /usr/share/man/man1/add-apt-repository.1.gz
The default add-apt-repository application located in (/usr/bin/add-apt-repository) works for Debian. So if you’re using Kali, chances are it won’t work. There’s a nice fix for that which I will add at the bottom of this post, (try them on VirtualBox if you feel like). But I found we can just mimic Ubuntu Oneiric to make add-apt-repository work.cd /usr/sbin
vi add-apt-repository
Add the following code and save the file.#!/bin/bash
if [ $# -eq 1 ]
NM=`uname -a && date`
NAME=`echo $NM | md5sum | cut -f1 -d" "`
then
ppa_name=`echo "$1" | cut -d":" -f2 -s`
if [ -z "$ppa_name" ]
then
echo "PPA name not found"
echo "Utility to add PPA repositories in your debian machine"
echo "$0 ppa:user/ppa-name"
else
echo "$ppa_name"
echo "deb http://ppa.launchpad.net/$ppa_name/ubuntu oneiric main" >> /etc/apt/sources.list
apt-get update >> /dev/null 2> /tmp/${NAME}_apt_add_key.txt
key=`cat /tmp/${NAME}_apt_add_key.txt | cut -d":" -f6 | cut -d" " -f3`
apt-key adv --keyserver keyserver.ubuntu.com --recv-keys $key
rm -rf /tmp/${NAME}_apt_add_key.txt
fi
else
echo "Utility to add PPA repositories in your debian machine"
echo "$0 ppa:user/ppa-name"
fi
Note: In this line echo "deb http://ppa.launchpad.net/$ppa_name/ubuntu oneiric main" >> /etc/apt/sources.list I’ve used Oneiric. You can try to use Lucid, Raring or Saucy as per your choice. Now chmod and chown the file.chmod o+x /usr/sbin/add-apt-repository
chown root:root /usr/sbin/add-apt-repository
Now that we added the correct code, we can use add-apt-repository to add a PPA repository. I tried the following to add themes and custom icons in Kali Linux./usr/sbin/add-apt-repository ppa:noobslab/themes
/usr/sbin/add-apt-repository ppa:alecive/antigone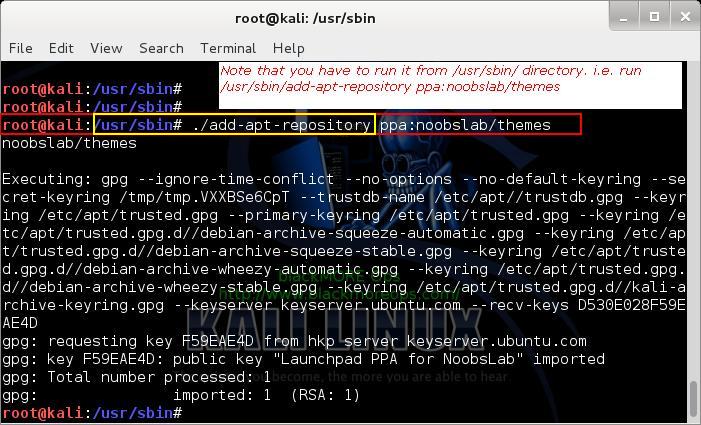
I’ve removed all screenshots from this post, but if you want see read and understand how it all works, I suggest reading the details post on adding PPA repository add-apt-repository in Kali Linux.
11. Install Tor
Tor is free software and an open network that helps you defend against traffic analysis, a form of network surveillance that threatens personal freedom and privacy, confidential business activities and relationships, and state security. This guide guides your through installing tor in Kali Linux. Tor protects you by bouncing your communications around a distributed network of relays run by volunteers all around the world: it prevents somebody watching your Internet connection from learning what sites you visit, and it prevents the sites you visit from learning your physical location. ![]()
Tor is available in Kali repository, to install it directly from the repository open your Terminal and type this:apt-get install tor
Enable tor service from command line:apt-get install tor
Browse with confident by using proxychains and torproxychains iceweasel
To keep things simple in this post, I’ve only shows one part of using Tor. You might want to read the full details in Installing Tor In Kali Linux post.
12. Install Filezilla FTP Client
No Linux installation is complete with a proper fully fledged FTP Client. Filezilla is the best out there, so install Filezilla using the following command:apt-get install filezilla filezilla-common -y
13. Install HTOP and NetHogs
This is a special one, HTOP shows running process and memory used including many more details. (you could use top command, but HTOP is just more useful). NetHogs is useful and it shows traffic used by applications per interface. Install them using the following command:apt-get install htop nethogs -y
You can now run then using the following commands:htop
nethogs eth0
nethogs wlan0
I’m almost certain, you’ll enjoy using these tiny tools.
14. Install proprietary drivers for your Graphics card
Depending on which graphics card you’re using, (AMD or NVIDIA), you might want to install proprietary drivers to unlock more features. There’s some excellent post I’ve made on Install AMD ATI proprietary driver (fglrx) in Kali Linux. 
NVIDIA users can just stick to the official documentation for installing NVIDIA Drivers. In case, official documentation is not working or you’ve hit rock bottom, you can try following this other post I’ve written to installNVIDIA binary drivers manually. 
15. Install Recordmydesktop and Reminna Remote Desktop Client
Recordmydesktop gives you the ability to record and make a video of your activities in Kali Linux. Remmina is simialar to Windows Remote Desktop Client. Both very useful. Install them using the following command:apt-get install gtk-recordmydesktop recordmydesktop remmina -y
16. Install GDebi Package Manager
dpkg is a powerful tool, but it doesn’t install dependencies automatically. What we need is some package installer that can go out and fetch all required dependencies while installing a .deb package. The best one out there is gdebi. Install it using the following command:apt-get install gdebi -y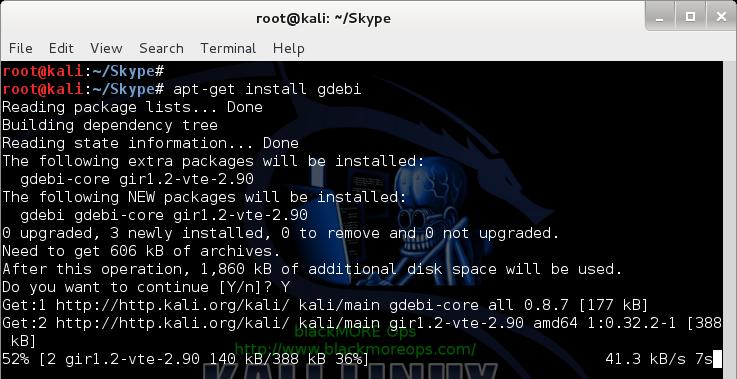
Enhancements and accessibility
17. Install a theme
Installing theme and revving up your desktop is a great idea. Kali default desktop is dull and boring. There’s two different ways you can change theme.
Manually install theme
Install theme via PPA repository
Read details here to and find out how to change or install GTK3 themes in Kali Linux. ![]()
18. Install a new desktop environment (I prefer XFCE).
I prefer XFCE Desktop, but you can try to install/remove different Desktop Environments or Window Manager in Kali Linux Depending on which one you need choose links below:
How to install/remove XFCE Desktop Environment in Kali Linux
How to install/remove different KDE Desktop Environments in Kali Linux
How to install/remove LXDE Desktop Environment in Kali Linux
How to install/remove GNOME Desktop Environment on Kali Linux
How to install/remove Cinnamon Desktop Environment in Kali Linux
How to install/remove MATE Desktop Environment in Kali Linux
Finally, follow follow these instructions to permanently switch Desktop Environments.(i.e. boot into XFCE instead of GNOME). 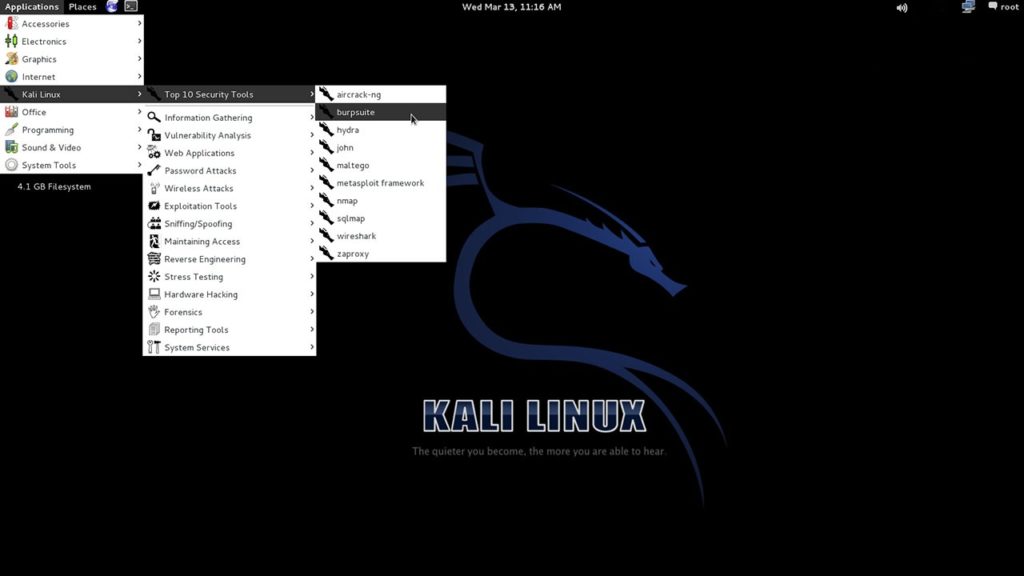
19. Enable Autologin user
It’s a simple change. Just open and edit the file called /etc/gdm3/daemon.conf, assuming you’re using GNOME Display Manager(gmd3) a your main Display Manager. You might want to try out other desktops as well. Here’s a link to Add/Remove different desktop Managers in Kali Linux.root@kali:~# leafpad /etc/gdm3/daemon.conf
In the daemon section un-comment the 2 lines for automatic login. It should finally look like this[daemon]
# Enabling automatic login
AutomaticLoginEnable = true
AutomaticLogin = root
That’s it. Too easy. In case you’re wondering how to use a different user than root, here’s how[daemon]
# Enabling automatic login
AutomaticLoginEnable = true
AutomaticLogin = myanotheruser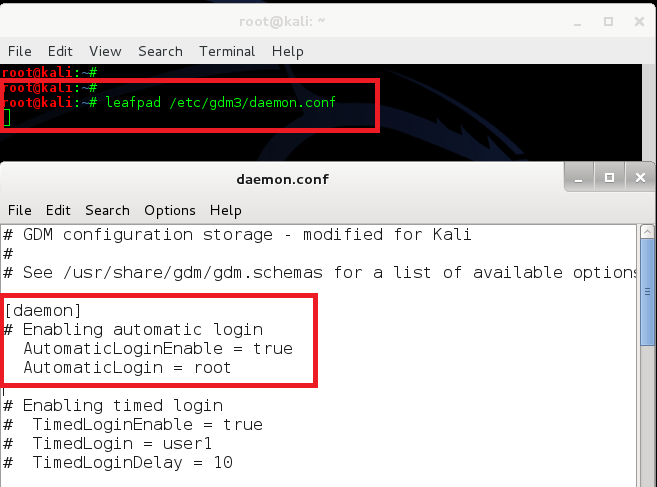
Last but not the least, reboot to check if it worked. (which it will, cause it’s Linux and Kali is awesome)reboot
You might want to follow up on this one or if you’re KDE user, then here’s the instructions to Auto login root user at system start in Kali Linux – GNOME and KDE. This article also shows how to auto-login a different non-root user… quite handy.
More Advanced stuffs:
This part explains how to get more out of your system, specially Graphics card.
20. Unlock GPU processing
Last but not the least, GPU processing is a lot faster when you’re trying to break a password. Depending on your Graphics card, you choose options as outlined below:
a. AMD
Install AMD ATI Driver (fglrx) in Kali Linux 1.x
Then follow rest of the guides here
Install AMD APP SDK in Kali Linux?
Install Pyrit in Kali Linux?
Install CAL++ in Kali Linux?
b. NVIDIA
NVIDIA users can just stick to the official documentation for installing NVIDIA Drivers.
In case, official documentation is not working or you’ve hit rock bottom, you can try following this other post I’ve written to install NVIDIA binary drivers manually.
Install Nvidia Kernel Module Cuda and Pyrit in Kali Linux
Hope you’ve found these useful. You might not have to use all of these, but some are definitely recommended. Thanks for reading. Please share.
About Metro UI Theme
Lorem ipsum dolor sit amet, consectetur adipisicing elit, sed do eiusmod tempor incididunt ut labore et dolore magna aliqua. Ut enim ad minim veniam, quis nostrud exercitation ullamco laboris nisi ut aliquip ex ea commodo consequat. Duis aute irure dolor in reprehenderit...


0 komentar :
Posting Komentar